Privacy in voice assistants?
Having my issues with privacy in regards to voice assistants like Alexa or Google home, I needed something that works without cloud services, Rhasspy delivers but getting there is quite a bumby ride.
After a few days of research, rhasspy seems to check all my boxes and seems fairly easy to install. It can be integrated with satellite systems, seems quite configureable and integrates with different systems and has a lot of documentation. Since it has so many options of how it can be used, it also creates a lot of headache and misunderstandings for someone who is new to these things.
Where some would just go out and buy an alexa or google home and be done with it in a few minutes, I opted for the bumpy ride that took me almost two days to get anything running. Just like in this Fowl Language Comic: https://tinyview.com/fowl-language/2022/01/07/weird-hobbies
Yeah, I know, I am very weird but guess what, I don’t give a fuck :)
Hardware
Here’s my hardware I ended up using in the final setup:
- 1x Rapsberry Pi 3B
- 1x Home Assistant (already existing setup)
- 1x Matrix Voice (not the creator, just the voice board)
Prepare the raspberry
Flash a Debian buster to the raspberry, be careful to really install buster, and not the meanwhile released bullseye, the matrix drivers are not available for bullseye and you will just waste your time.
Install Matrix software
This is based on the official documentation, I just added the -L option to curl so it follows redirects. It also includes the alsa + matrix kernel module installation parts.
curl -L https://apt.matrix.one/doc/apt-key.gpg | sudo apt-key add -
echo "deb https://apt.matrix.one/raspbian $(lsb_release -sc) main" | sudo tee /etc/apt/sources.list.d/matrixlabs.list
sudo apt-get update
sudo apt-get upgrade

sudo apt install matrixio-creator-init portaudio19-dev matrixio-kernel-modules
Once this is done, reboot the Raspberry then SSH back into your Raspberry Pi and enable the ESP32 communications.
sudo voice_esp32_enable
esptool.py --chip esp32 --port /dev/ttyS0 --baud 115200 --before default_reset --after hard_reset erase_flash
Now the LED should stop. You don’t need to continue the ESP32 Setup from the matrix web page. Even though the Matrix could be used as a ESP32 Rhasspy Satellite, I have very little success with this approach, more on that later.
Now that you have the Matrix board and your Raspberry, you can go on an install rhasspy.
Installing Docker + Rhasspy
I will not explain to much here, you can read the details in the rhasspy documentation, this part should be easy to understand.
$ curl -sSL https://get.docker.com | sh
$ sudo usermod -a -G docker $USER
$ reboot
$ docker run -d -p 12101:12101 \
      --name rhasspy \
      --restart unless-stopped \
      -v "$HOME/.config/rhasspy/profiles:/profiles" \
      -v "/etc/localtime:/etc/localtime:ro" \
      --device /dev/snd:/dev/snd \
      rhasspy/rhasspy \
      --user-profiles /profiles \
      --profile en
While this is running, you can continue to prepare home assistant.
Install Rhasspy on home assistant
“Wait, why install another rhasspy?” I hear you ask. Well, the previous one running on the raspberry 3 will be the satelite. The one that will have the microphones and send the data to the base system, the base system will be the one running on the home assistant Installation.
Go to Configuration -> Add-ons -> Add-on Store, click on the dots on the upper right and click on Repositories after which you add the Rhasspy repository https://github.com/synesthesiam/hassio-addons

After that you can install the Rhasspy Assistant and open the Rhasspy Web UI
Configure Rhasspy on Home Assistant
This will be the so called Base System, not the satellite running on the separat raspberry.
Go to Settings, set MQTT to external and enter the IP of your home assistant + MQTT Credentials of the MQTT installed on home assistant. If you have not yet installed MQTT on home assistant, do so now.
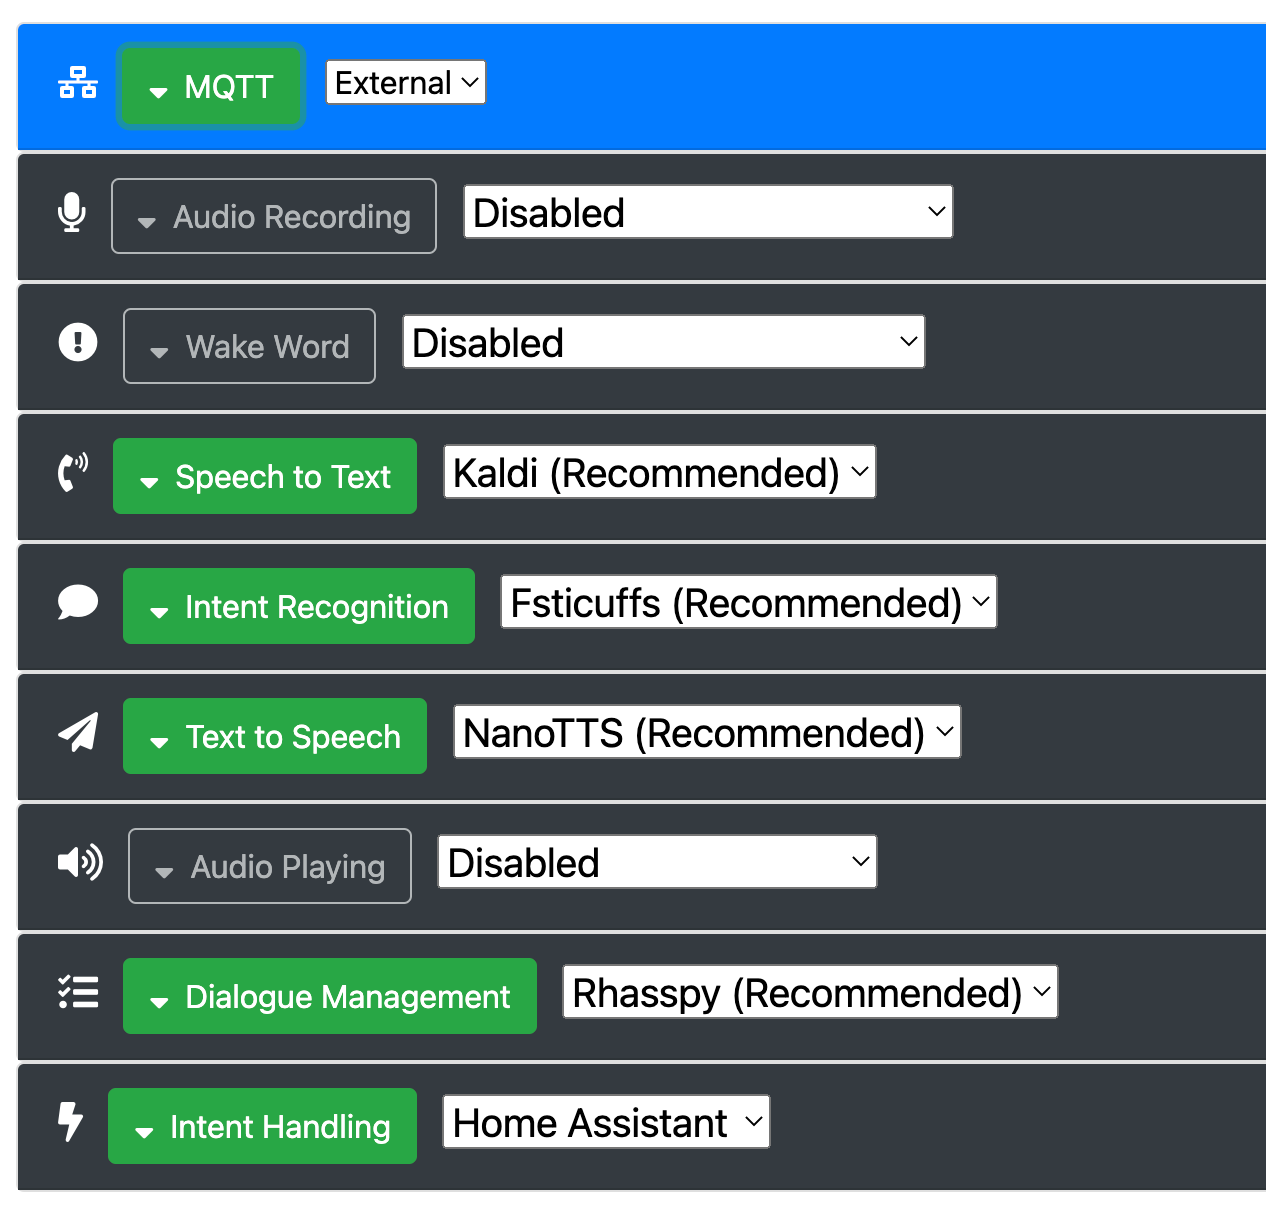
Go through each enabled setting and make sure to enter satellite under the siteIds. You can rename it later, or add other siteIds, I just stuck with the same value used in the Rhasspy documentation.

Once this is done, save, download whatever rhasspy might need to download and go back to the satellite.
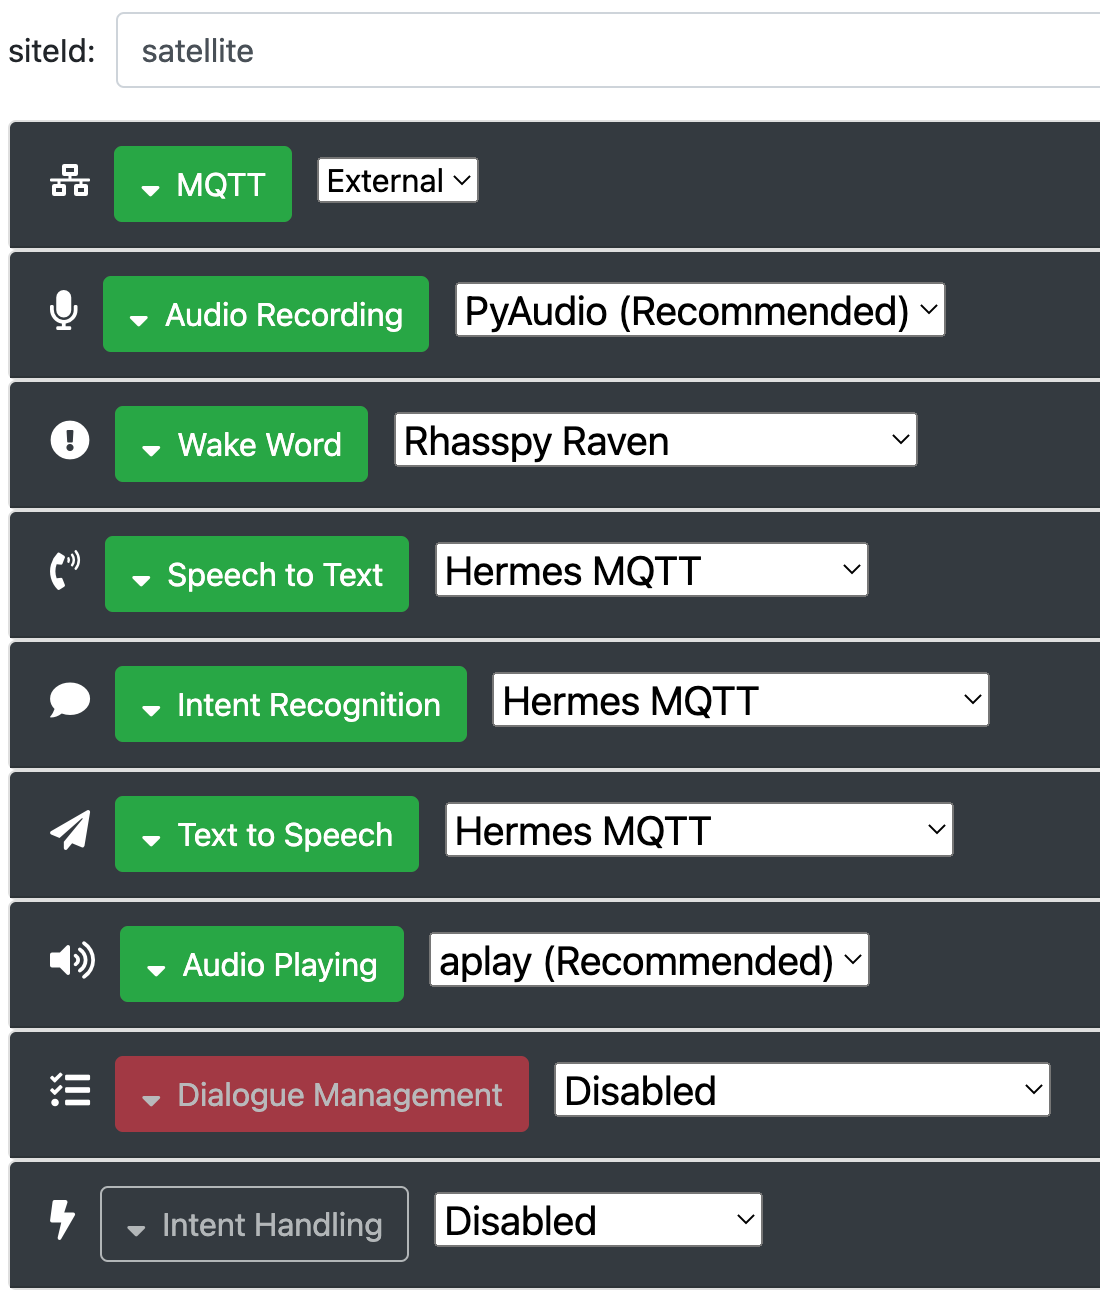
Configuring the satellite
Open the Web UI of the satellite which should be running on the raspberry ip + port 12101.
Set the siteId to satellite configure MQTT to connect to the same home assistant MQTT as the base system and enable services as follows.
Setup Audio recording
Select the Matrix-sound as microphone for the audio recordings. I was offered two options, the first one with MATRIXIO-SOUND worked for me so I went with that one. You might have to experiment what works for you.
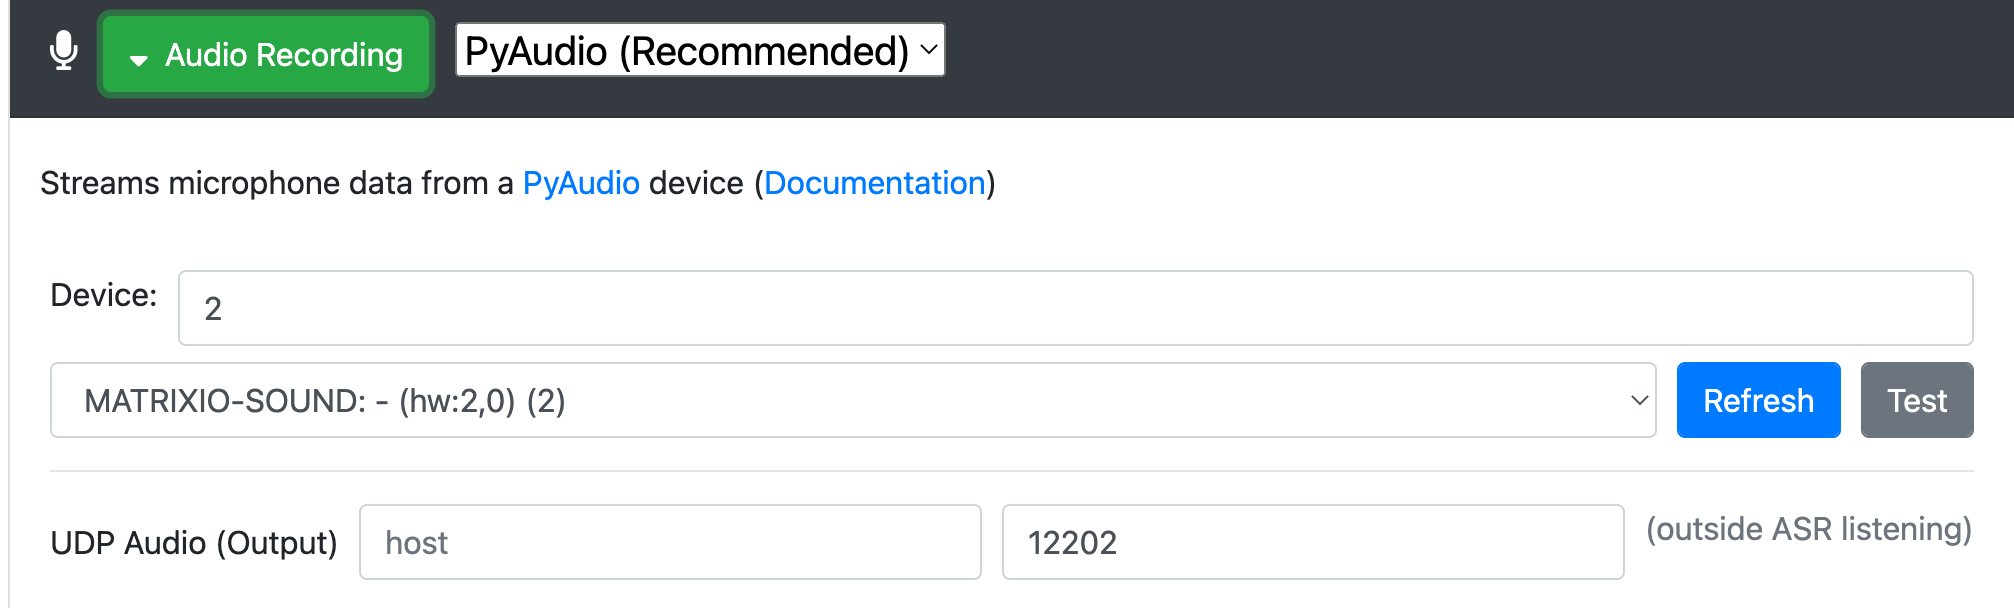
Set the UDP Audio port to 12202 or any other free port on the satellite system. You can read more about this in the rhasspy “Server with Satellites” documentation
By default, your satellite will stream all recorded audio over MQTT. This will go to both the wake word service (satellite) and ASR service (base station).
If you wish to keep streaming audio contained on the satellite until the wake word is spoken, you need to configure a UDP audio port for both the audio recording and wake word services.
Hence the port 12202. As mentioned in the original documentation, do this in the Wake Word setting as well.
Since I needed a custom wake word, (thanks Disney for Encanto, now I have to call my home “Casita”) I couldn’t use the recommended Porcupine software for Wake word detection but had to go with Raven and record my custom wake word. It does work good enough, to early to say and I will follow up when I have more details.
When this is all set, save and this should be it with the satellite system and the base system. The Question now is, how do you test this?
Defining intents on Home Assistant
Well, the test isn’t that straight forward. Rhasspy doesn’t provide much information what it did or didn’t do on the base system once something was done on the satellite system. So to test this, let’s actually integrate it into home assistant.
On the base Rhasspy (the one running on home assistant) under settings -> Intent Handling.
Enter the home assistant IP + Port and a long lived token, select “Send Intents to Home Assistant” and don’t forget to enter satellite under Satellite siteIDs.

To get a long lived Home Assitant token, click on your username on the bottom left (in home assistant) then scroll all the way down and click add token.
This should forward any intents from rhasspy to home assistant, but we are not done yet since home assitant has no clue on what to do with these intents.
Open up you configuration.yaml from home assistant and enter something like this at the bottom of the file for example. Check your yaml and restart home assistant.
intent:

intent_script:
  GetTemperature:  # Intent type
    action:
      service: tts.amazon_polly_say
      data:
        message: Hello from an intent!
        entity_id: media_player.lindeman
wait, wtf is this?
If you look at your Rhasspy (on the satellite) under sentences, you will see an initial configuration like this:
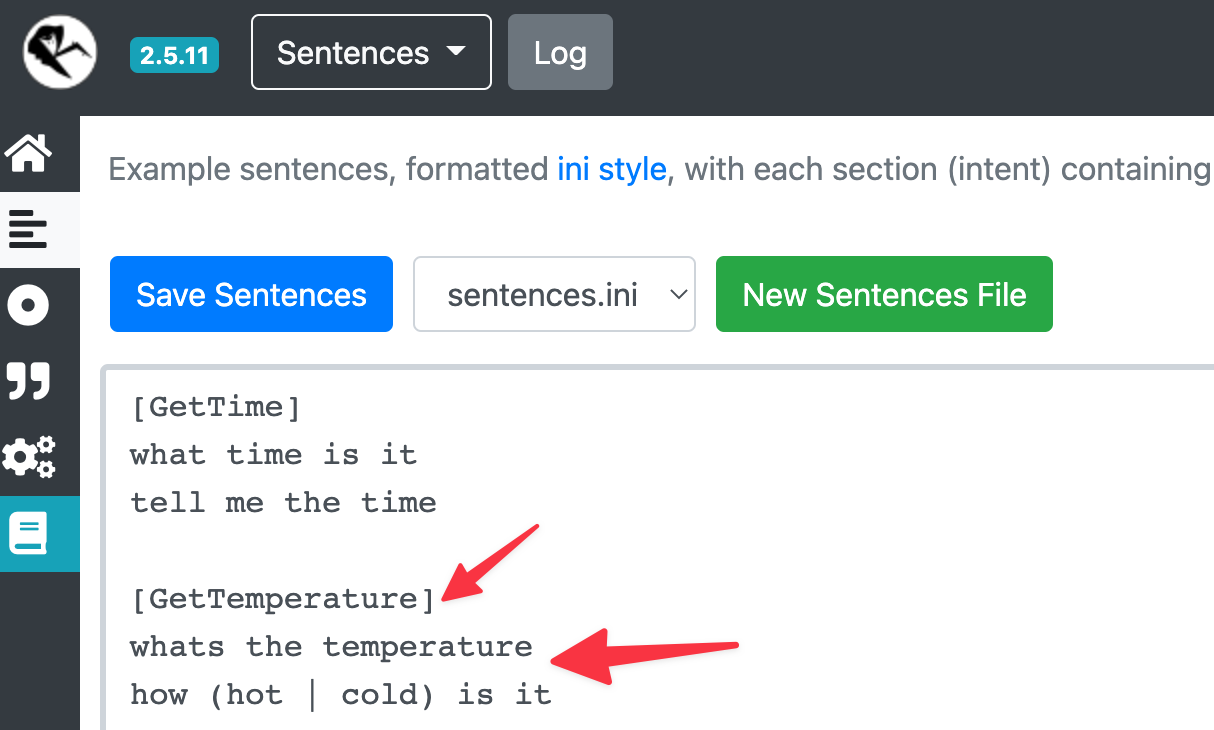
This means the voice command “whats the temperature” will be converted to a GetTemperature intent, which we just configured in home assistant to execute the action service: tts.amazon_polly_say with the data message: Hello from an intent! and entity_id: media_player.lindeman (yes I might listen too much Rammstein 🤷🏻♂️)
This will convert the text “Hello from an intent!” via Amazon Polly and send it to my living room sonos. If you have not set up home assistant to use TTS this will be no real help for debugging, so let’s do something different instead.
Let’s change our intent part to look like this:
intent:

intent_script:
  GetTemperature:  # Intent type
    action:
      service: tts.amazon_polly_say
      data:
        message: Hello from an intent!
        entity_id: media_player.lindeman
  GetTime:
    action:
      service: mqtt.publish
      data:
        topic: action/get_time
This assumes that you have node red installed on your home assistant, and if you don’t, stop here, go install node red and start doing awesome stuff.
Create a small flow, a mqtt subscription to action/get_time with a debug node.
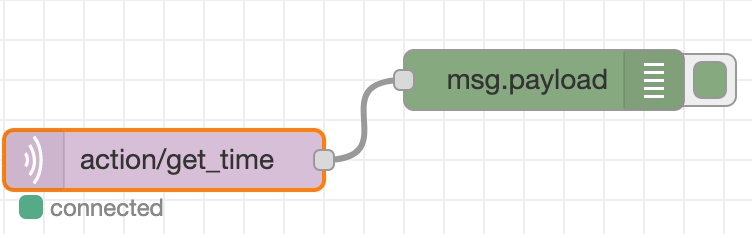
Now speak your magic wake word and the command “What time is it” and keep an eye on the node red debug window

Tada 🎉 our command was converted to an intent on the satellite system, sen’t to the base system which then send’s it to home assistant and this triggers the Intent script which pushes to action/get_time in MQTT and we finally have our debug message.
My issue with the ESP32 Rhasspy Satellite version.
I managed to flash the software on the matrix voice, it connected to wifi and it does look much better without the Raspberry underneath it. The problem is that I have quite poor quality. When it finally did catch some recordings, I could listed to the recorded wav files which didn’t sound that great, often they where also missing pieces of the speech which could have to do with the fact that speech is sent in WAV chunks via MQTT. I did like the fact that the LED also react when the wake word was spoken but since it worked rather poor I dropped this idea and used the Matrix Voice connected to the Raspberry via GPIO. But, if you want to go down this road, you will need again a raspberry with buster, not bullseye. You don’t need the kernel modules for this, just the matrixio-creator-init is enough. Follow the instruction here: https://matrix-io.github.io/matrix-documentation/matrix-voice/esp32/ starting from step 2 since you have already done step1.
You can skip the git clone of esp32-platformio and just go ahead and clone https://github.com/Romkabouter/ESP32-Rhasspy-Satellite
Open the ProjectIO folder from the cloned project in PlatformIO (after you have installed Visual Code and the PlatformIO Extension), copy the settings.ini.example to settings.ini and follow the README.
As for the settings, there some things that confused me, so here are some additional infos.
The hostname is the hostname that will be defined for the Matrix board but also the IP address for a later OTA update if you don’t want to always do that via the Raspberry. So if you plan to use OTA update, the hostname should be resolvable from your machine where you will do the flash from or just use an IP address.
Using some very weird characters like & in the wifi password will fail during compilation, you will have to escape it with & to compile.
Configure MQTT to connect to your home assistant MQTT with IP + Credentials. Everything else is described in the readme. Once you have compiled this, from within the PlatformIO directory in the terminal run this command
pio run --target upload
which will flash the Matrix board via GPIO on the raspberry. If you change the method to ota in the settings.ini, it will try to flash directly to the matrix board, but this has not worked for me. I didn’t investigate further, the port might be wrong or credentials, I don’t know and didn’t care any more at this point since it really didn’t work very well.
Next steps: intents via WebSocket directly in node red, which probably will make configuration much simpler since you don’t need to keep editing the configuration.yaml file.